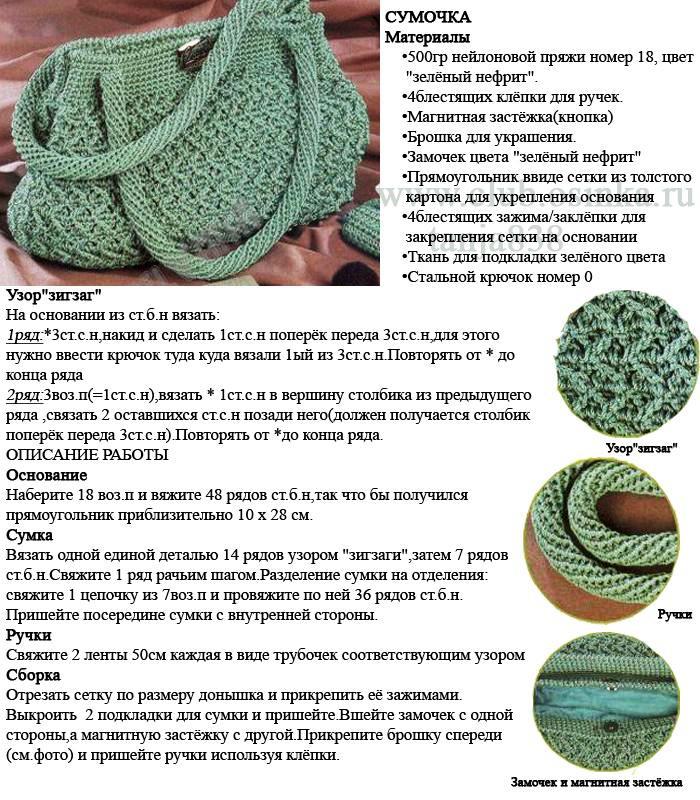
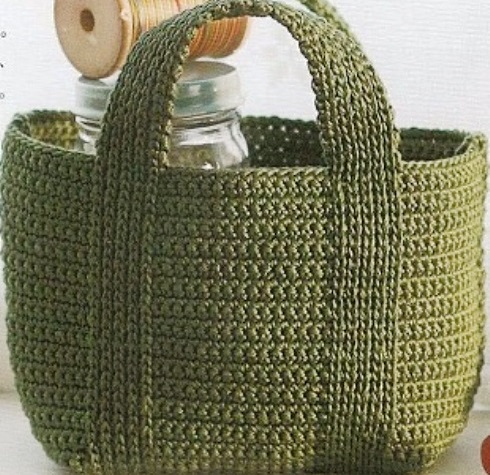
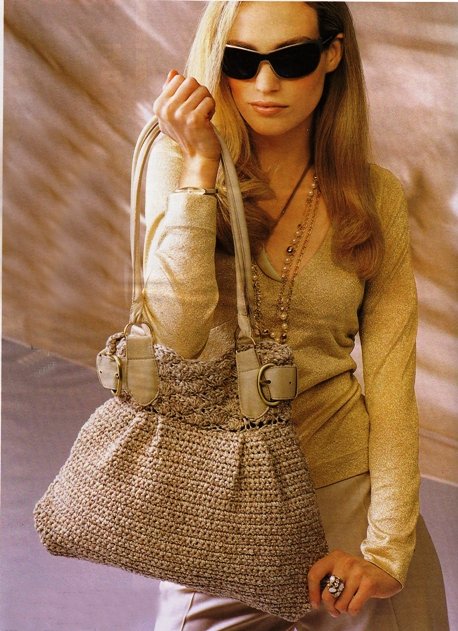
Now I’m picking up various options for making handles for bags. Dense and not very, wide and narrowest, beautiful and beautiful, and most importantly - comfortable. Oh yes! And more convenient :)
I needed:
- Linen yarn in two colors (optional).
- Regiline 0.4 cm wide.
- Carbines.
- Needle, thread.
- Good mood.
3.
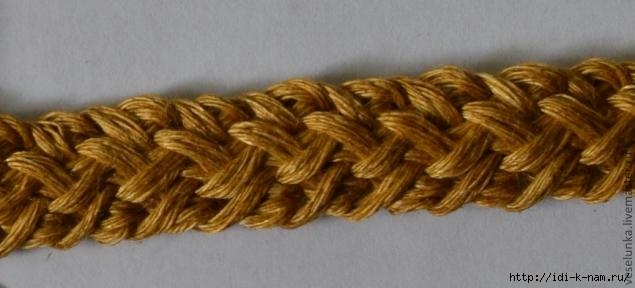
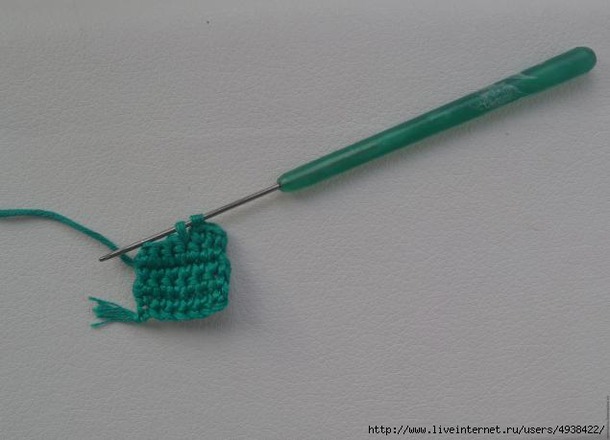
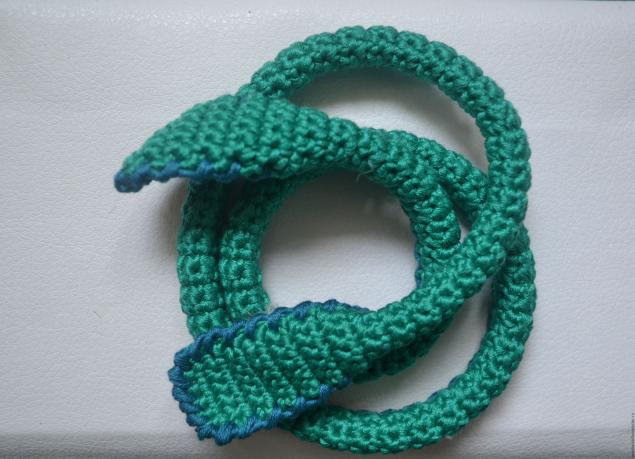
So, for starters, I knitted with a lighter color yarn just a cord - a little more than a centimeter wide. Here is one:
4.
The cord can be knitted with any pattern that you like. I’ll tell you step by step how to complete this example.
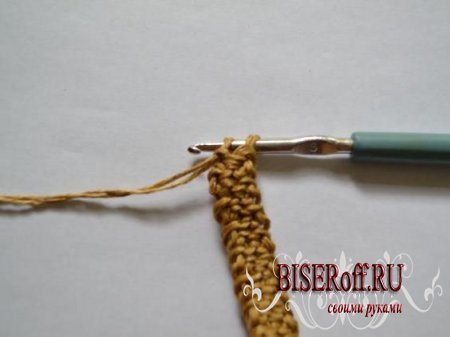
We gain 3 in. p., in the second and third we collect 2 loops, we knit a single crochet - all three loops together, unfold (the thread before work - this will be the wrong side) and we collect 2 loops, we knit three together and so on in a circle.
Here is the process:
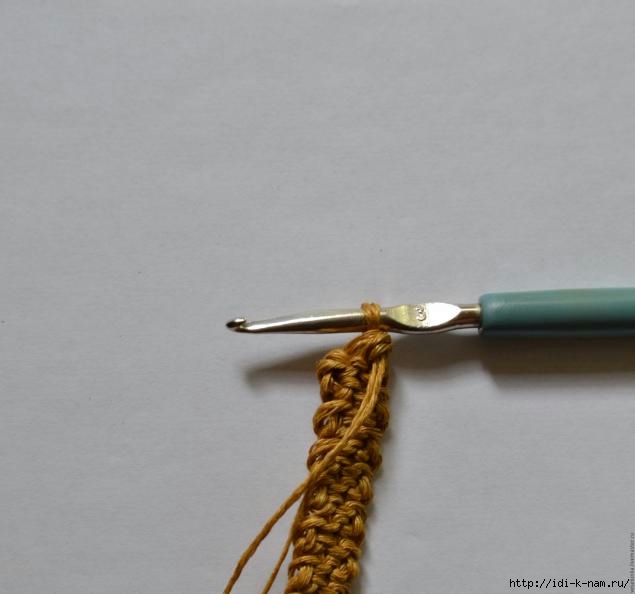
The thread at work. On the front side we stretch two loops.
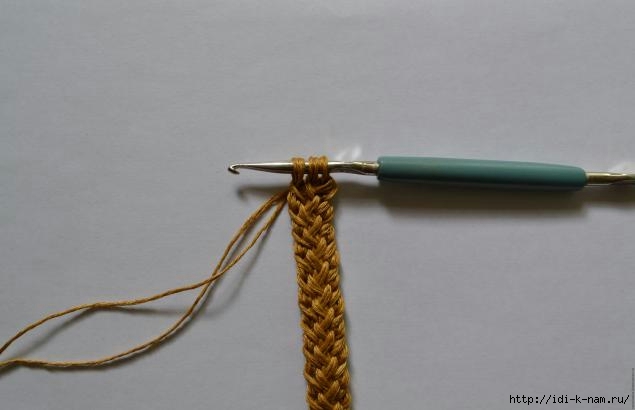
5.And knit them together 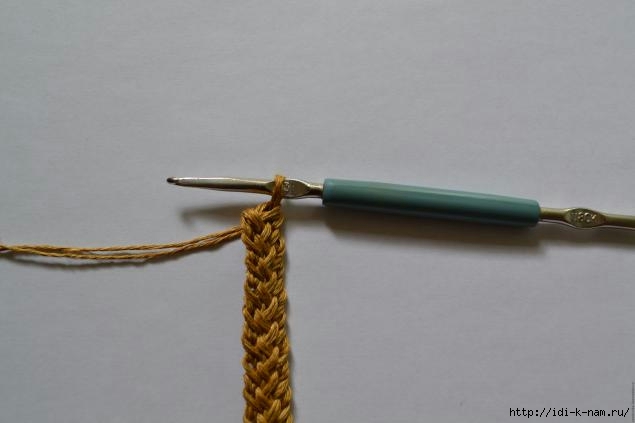
6.
Turn over to the wrong side. Thread BEFORE work.
7.
We collect one loop.

8.
9.
Pull the second loop. Pay attention to the crochet of the thread.
10.
11.
And also knit three loops together.

12.
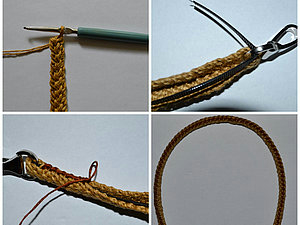
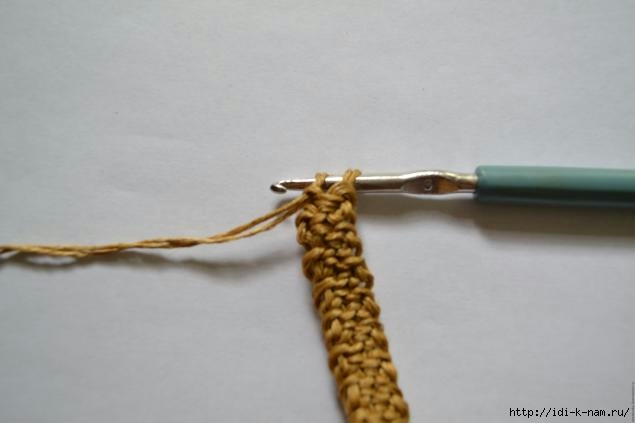
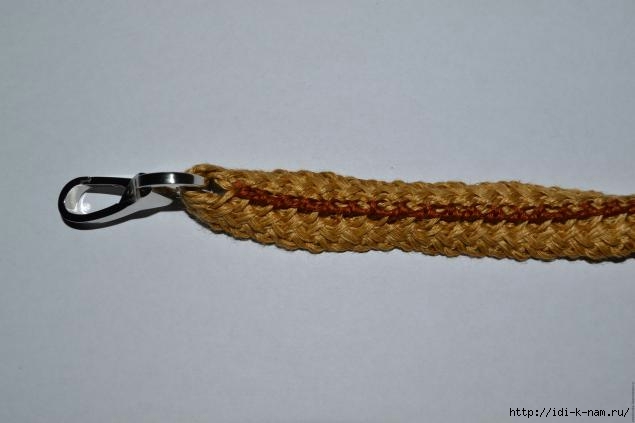
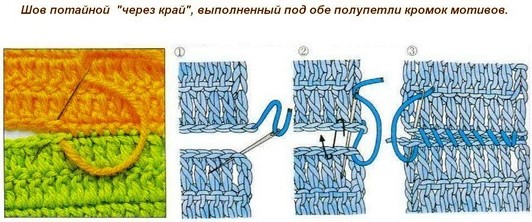
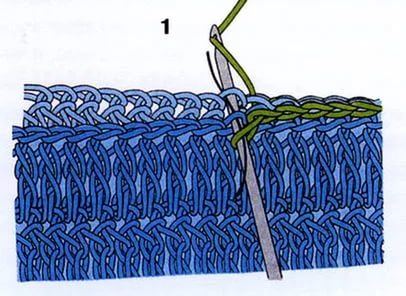
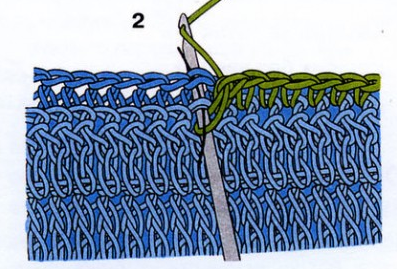
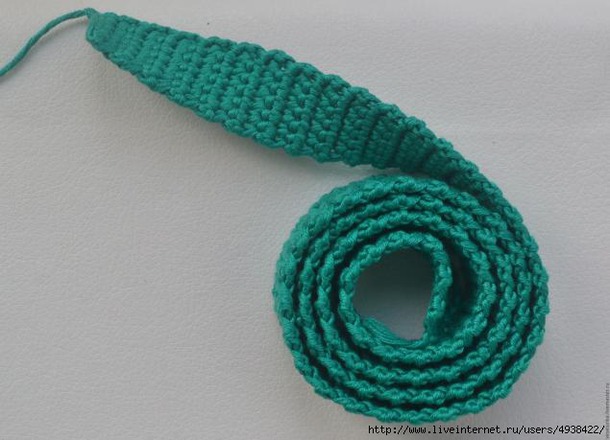
So we continue until we tie the cord of the desired length. Then we pass it through carbines and sew in the middle. We sew the lateral edge with a crustacean step with yarn of a different color:
13.
14.
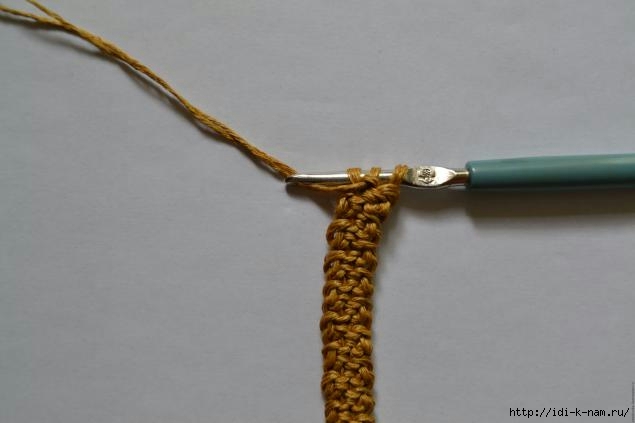
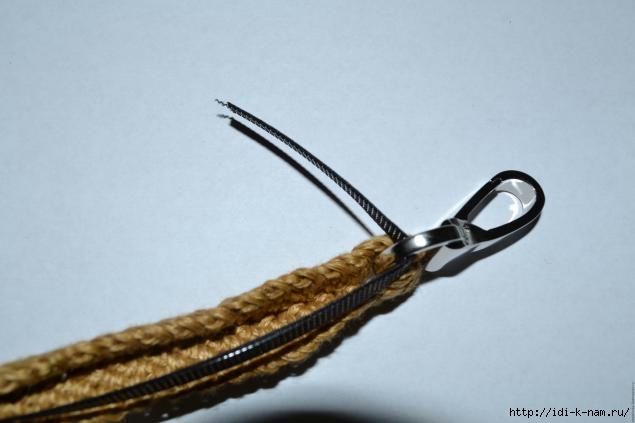
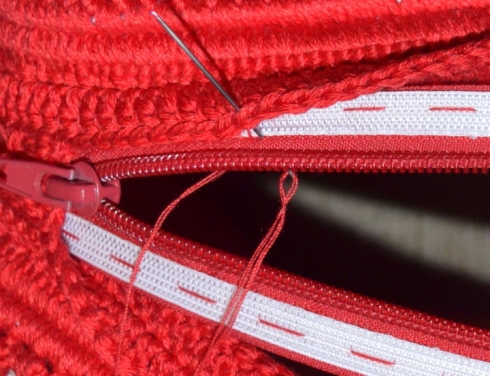
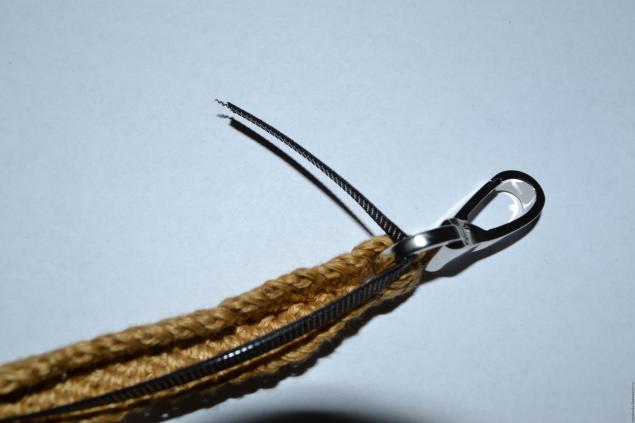
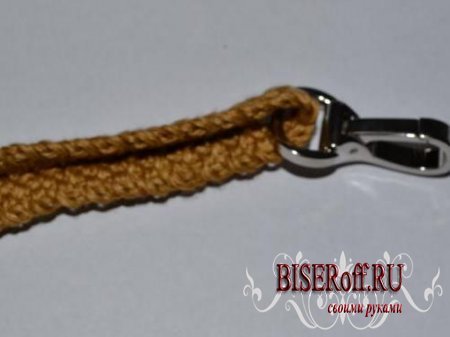
So, we bend the regilin around the carabiner, on the inside of the cord:
15.
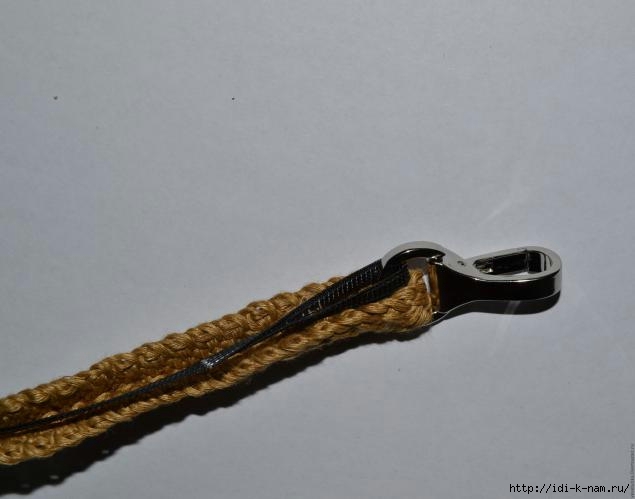
We sew regiline with a loop and put it inside:
16.
After this, we sew with a crustacean step and the second side edge:

17.
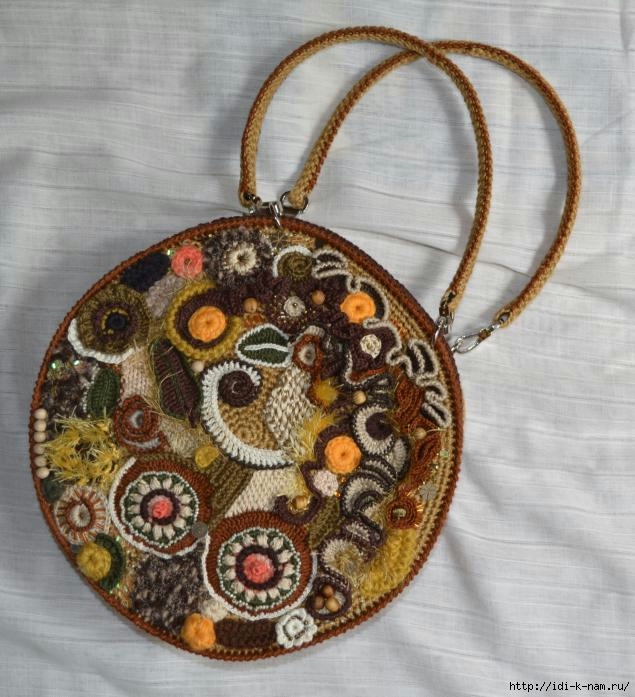
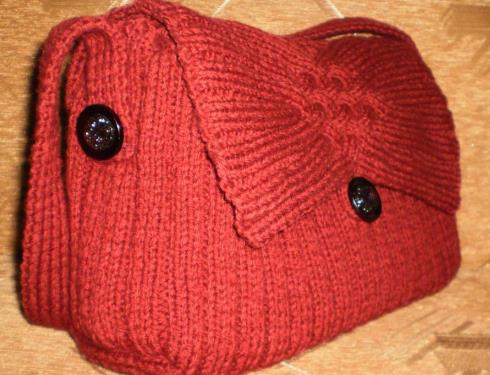
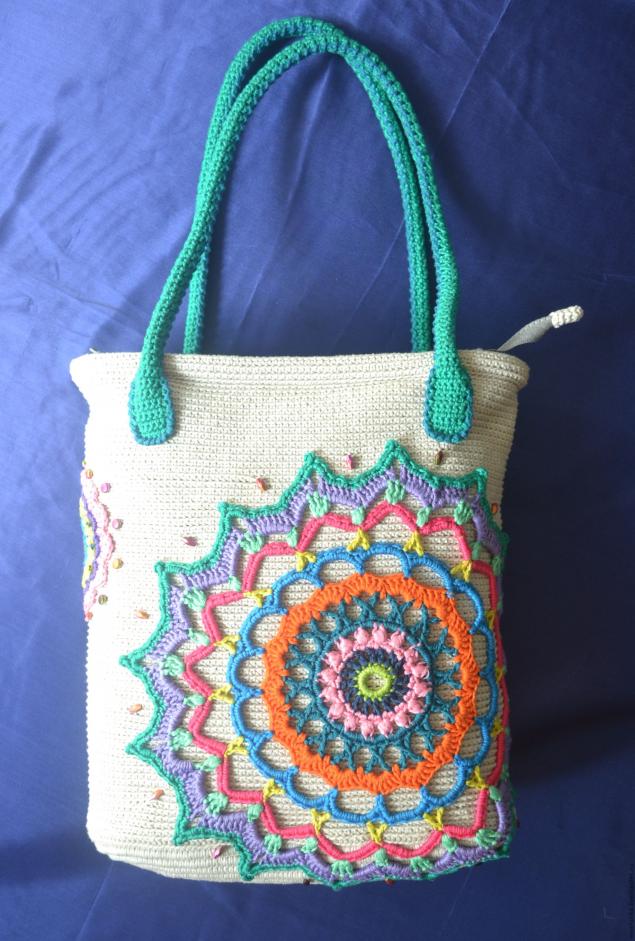
Performing these simple manipulations, we get the most real, neat, non-stretching handles that can only be attached to the finished bag! The handbag, by the way, will be ready by the end of the month tentatively :)
- everyday (shoppers - for shopping, comfortable and roomy - for work);
- for relaxation (suitcases - for trips; backpacks - for walking; for visiting the beach - connected from plastic bags);
- sports (small (in the form of a bracelet wallet) - for running, storing trifles; or more - for wearing a sports uniform, etc.);
- elegant (evening elegant clutches, wedding purses and pouches);
- etc.
The shape of the product, the color, the number of main and additional parts, the length and width of the handles, etc., depend on the purpose.

Be sure to think over the design and decor of the future knitted bag. Do you need decorative elements? What kind? Options for "decorations" can be many. Separately connected or fabric elements, rhinestones, applique - all this will “revive” your bag and make it unique.
You can even sketch a future product. Himself, or involve children in this. Joint creative process will benefit everyone. Children will enjoy the images of fairy-tale characters, funny animals or cartoon characters. Men prefer laconic minimalism, but they will not abandon the original geometric ornaments, names or emblems of their favorite sports team. Women are unpredictable: someone is delighted with flowers and butterflies, and some give Gothic symbolism. In general, the appearance of your future masterpiece is exclusively a matter of taste. No one will surely have a second such knitted bag, this is the whole charm of hand-made products.
Selection of materials for the manufacture of bags
- Based on the choice of bag, we select materials. The most important thing is the yarn with which you will knit. For summer openwork handbags, linen and cotton are suitable. Multi-colored patterns and intricate aranian ornaments will look great on bags made of thick wool and acrylic. Beach and shopping options allow the use of any materials, up to the most exotic. Bags are knitted of twine, plastic bags, satin ribbons and even just strips of fabric, cut and sewn with one thread. And "taste, color" ... It all depends on your imagination.
Important: the yarn must be strong and keep its shape well.
- To knit a bag, you can take knitting needles or a hook - it all depends on the skills and preferences of the craftswoman - one likes the laconic front surface and intricate patterns, the other is closer to the “crocheting” of the motives. The size of the knitting needles or hook depends on the thickness of the yarn and the density of knitting.
- In addition, the bag needs handles. They can be knitted from fabric, leather (for example, from an old bag). And you can buy ready-made - bamboo, wooden, plastic.
- For lining a knitted bag, it is better to choose a thick satin fabric. Recently, in order to shape the bags, lining fabric with a thin layer of synthetic winterizer or non-woven is increasingly used.
- There are little things left. We select accessories. Decide how the bag will be fastened. The most common fasteners on: zipper; sewing or magnetic buttons; buttons Velcro tape (Velcro); carbines. Perhaps such accessories in your model are not provided at all. Shopping and beach bags may well be without fasteners. Other necessary trifles - rings for pens, buckles for locks, appliqués, zippers for pockets, etc. we select depending on the chosen bag model.
How to tie a bag with your own hands for beginners: step by step
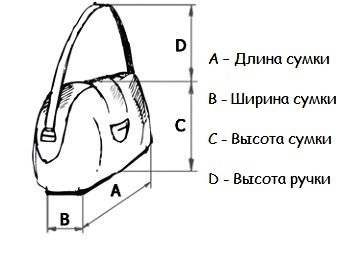
Pattern
Getting to work. It is necessary to make a pattern of a knitted bag of the right size. Where to get it? It can be found in magazines, books, on the Internet. Or build it yourself. The classic basis is a rectangle, such a pattern can easily be made of paper or cardboard. For a more complex model, consisting of several parts, you can take measurements from any finished bag you like and transfer them to paper. As an option - you can put an old bag, bought in second-hand departments literally for a penny, into parts and tie a new bag over them.
Probably the most simple pattern - bag bag. We knit a sufficiently long cloth, fold in half, sew or crochet on the sides, attach handles, if necessary, fasteners, pockets. Done! Simple as that, even a child can handle it.
By the way, a bag bag fits in the same way:
Another simple option is to tie the bottom of the bag according to the pattern, and then tie the cloth in a circular fashion. It will turn out a nice bag bag.

The bottom can be connected to any shape. They crochet a chain, then tie it on two sides in a spiral, making the necessary increases according to the scheme, depending on what they want to get in the end: an oval, circle, rectangle.
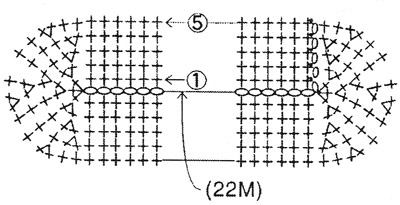 Crochet oval crochet pattern
 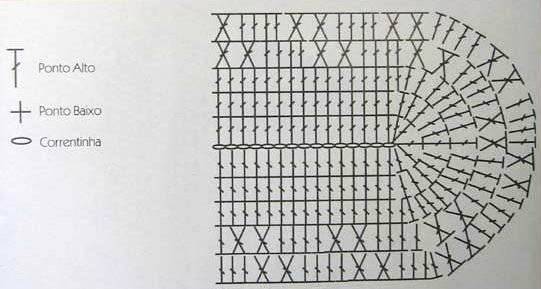 The scheme of knitting an oval with double crochets
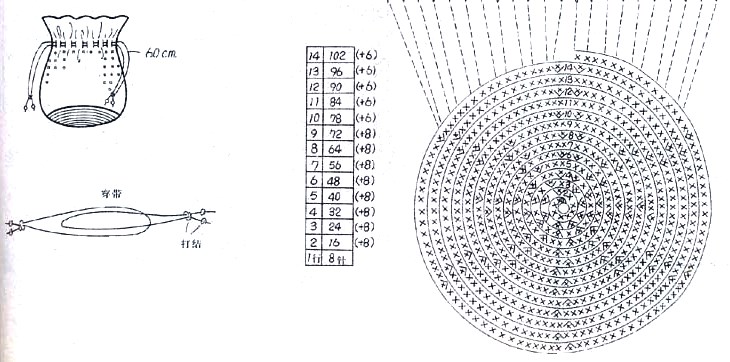
Bags with a leather bottom look especially beautiful. To do this, cut the bottom of a bag of a suitable size from genuine or artificial leather, using a special tool (can be replaced with a punch), holes are punched at the same distance, crocheted in a circle.
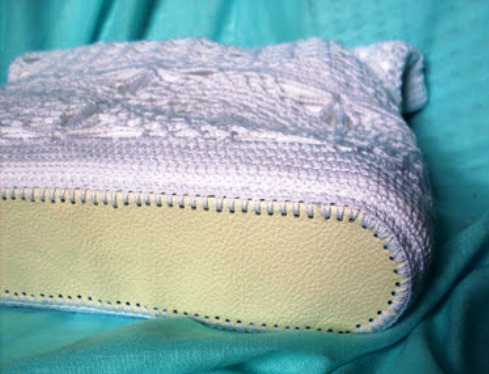
Stronger and more voluminous - a bag with four sides and a bottom. They are tied separately, and then sewn or tied. The bottom can be strengthened with a plastic frame. Inside, it is better to sew a lining of fabric.
The original design can be in bags a la backpack, bag or sack. For schoolchildren and kids, such an accessory is useful for a “shift” (see detailed), and for fashionistas - for an image and style. Their bottom is round, and the side parts are decorated with patterns.
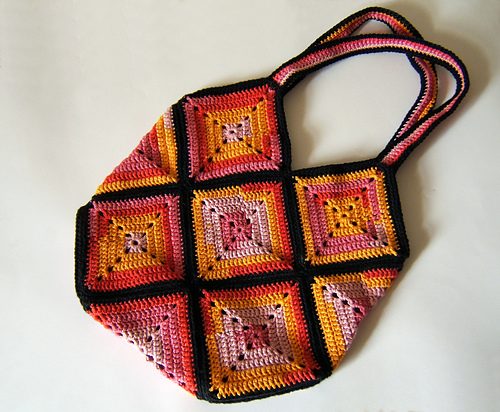
Convenient and beautiful bags are obtained from individual squares knitted or crocheted. They are sometimes called "grandmothers." Threads are better to take multi-colored.

It is interesting to combine different materials and techniques. Fabric, leather, knitted items, rhinestones and beads can peacefully coexist on the same bag. 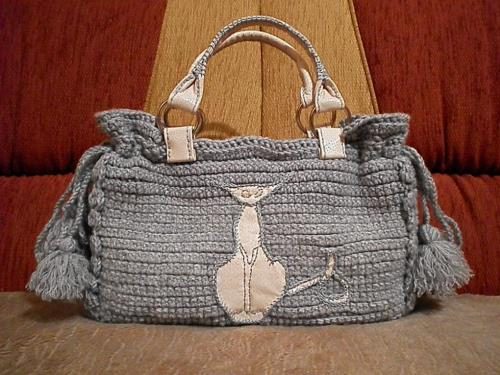
We knit the details in accordance with the pattern. Yarn should not be too thin. You can take not strings, but twine, cord or even plastic bags. The latter are pre-cut into strips, twisted and wound into balls.
Finished parts of a knitted bag are interconnected. They can be sewn - by hand or on a typewriter, in a way convenient for you.
Some people prefer crochet, thread of the same color, or vice versa - contrast. The connection must be strong.
Handles for a knitted bag
After the top of the bag is connected, you need to do the manufacturing of pens. They can be sewn, tied with a bag, attached to rings. Handles for a knitted bag can be single or double, knitted, sewn, etc.
To knit single handles, they knit a few loops with knitting needles and they knit mainly a garter fabric with a long cloth.
Or crochet several air loops and knit dense handles in single crochet columns.
 Double knitted handles for a bag can be made in several ways. For example, for one pen, knit two parts (see above) and sew or tie them together at the edges. You can tie a strip of double width and sew handles on only one side, preliminarily laying inward corsage tape for strength.
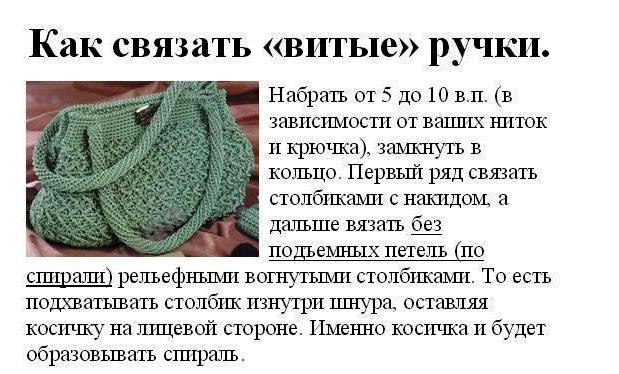
Handles can be tied in a spiral. Crochet - typing a few air loops, which are closed in a ring and knit in columns in a spiral pattern.
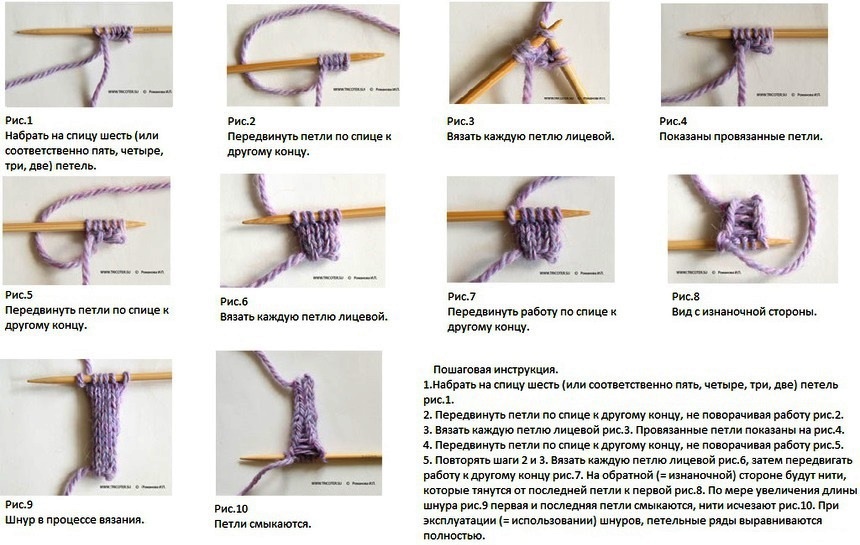
You can also knit round handles for the bag with knitting needles using the technique of knitting a hollow cord (another name is i-cord, i-cord, etc.)
I-cord - a knitted pipe invented by Elizabeth Zimmerman, originally called “Idiot’s Delight”, which literally means “idiot’s delight”
It is also easy and simple to sew handles made of fabric or leather. To do this, a strip of fabric is stitched along, turned on the front side, a thick cord is inserted for strength.
The length of the handles depends on the chosen model of the bag, as well as the height of the person. Therefore, when knitting, it is better to try on: attach pens with pins and see how long they should be knitted.
Sew handles to the bag with manual or machine stitches. More interesting are the handles connected by rings with straps that are sewn to the details of the bag:
Clasps
The time has come for fasteners. Zippers are convenient and practical, but they are rather difficult to sew in, not all beginners will cope with this. Much easier - buttons fastened with a buttonhole or magnetic buttons that are easily and simply attached. It’s even simpler to sew on Velcro tape (Velcro) for counting with counted stitches.
If you still decide to sew zipper in a knitted bag, you need to take into account several points:
- It is advisable to choose a zipper in the store before knitting, and not vice versa.
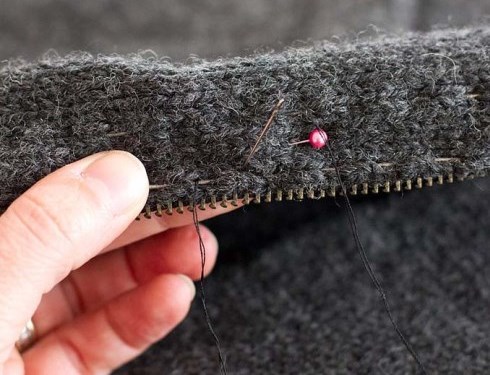
- A zipper is sewn to each half of the bag: first it is fastened with pins, then it is sewn with hand stitches and only after that it is sewn.
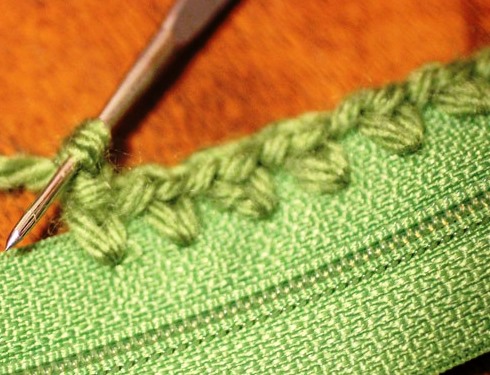
- You can sew a zipper into a knitted bag in several ways: with and without allowances, with manual or machine stitches, etc. There is an interesting way - they start knitting with a zipper and then continue knitting the bag in a circle. The bottom of the bag is then sewn or sewn on the bottom.
- As practice shows, it is still better to sew the zipper into the bag with hand stitches with strong stitches with a “back to the needle” stitch. To do this, tie the top of the bag with columns without a crochet. Pin the zipper with the pins to the details of the bag. Gently sew the zipper with durable “matching” threads.
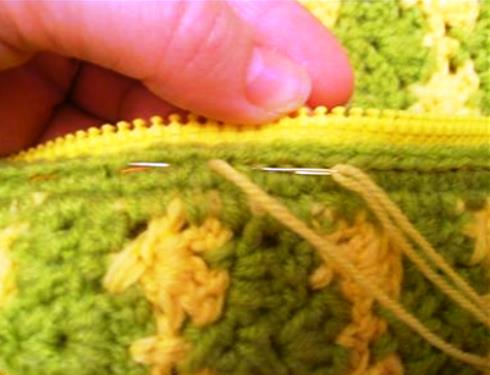
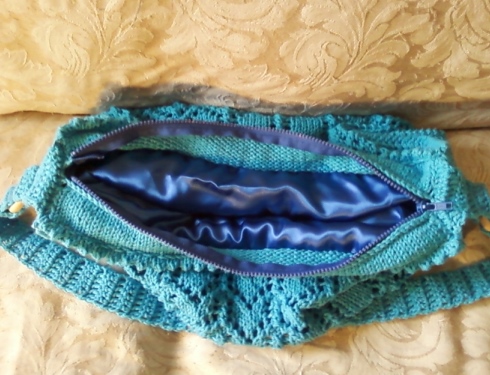
- Double-edged zipper can be sewn. To do this, on one side of the bag, collect loops from the top edge, knit several rows with crochet or knitting needles (single crochet or garter stitch), close the loops. The second part of the grind fits the same way. Between these stitches, one fabric edge of the snake is inserted and sewn first on the wrong side, then on the front side, or you can sew it right away. We do the same with the other side of the bag, we also knit two stitches, and sew the other fabric edge of the zipper into them.
Lining
The top of the bag and the handles are tied, the fastener is made, it is time to tackle the lining, which is necessary in most cases when knitting bags. After all, the lining will not allow the bag to stretch while wearing (knitted fabrics stretch very quickly and lose shape).
Cut out the details of the lining with allowances for seams, the details are similar to the top of the bag. Be sure to provide pockets on the lining - overhead or with zippers, it is convenient to store various trifles in them - from keys to a mobile phone.
The lining for the bag is very easy to sew - the parts are folded together with the front side inwards, stitched together on the sides, allowances for strength can be processed using an overlock or zigzag. The top of the lining can be hem seam with a closed cut.
Mostly the lining is sewn to the bag when the clasp is already framed and the handles are already sewn (however, there are exceptions). The lining is pinned to the product with pins and sewn with hand hidden stitches.
Decorate the bag
The most enjoyable part is decorating the bag. It can be decorated with rhinestones, sequins, beads, embroidery. Connect the fantasy. Especially elegant should be the handbags of little fashionistas and theatrical clutches.
There are many accessories: straps, carbines, buckles, buttons. The main thing is not to overload the product with them, otherwise the bag will deform and tear. Connect your imagination, and for inspiration, take a run on needlework websites on the Internet, there you can find many ideas.
The advantages of a homemade knitted bag - do not count. It is better to create several - for different sets of clothes and images.
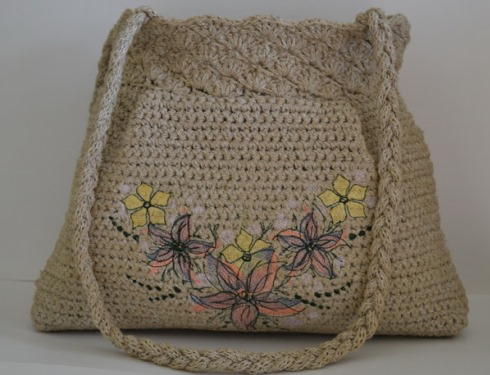
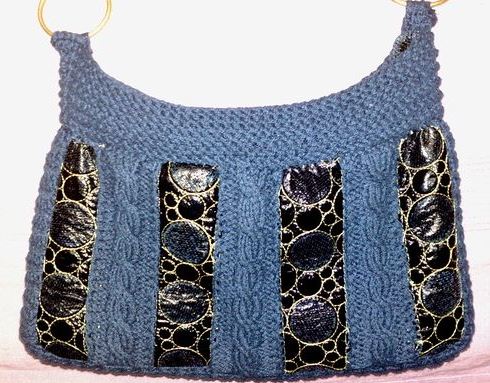
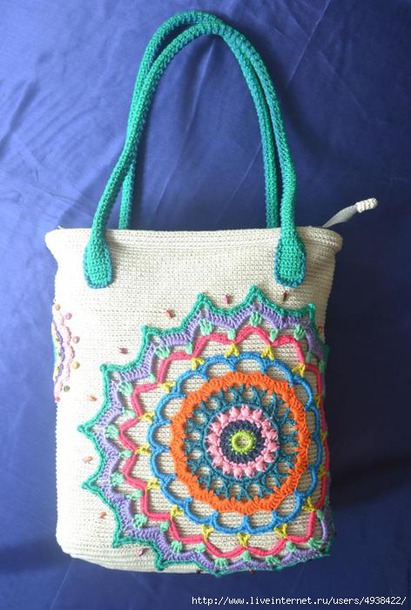
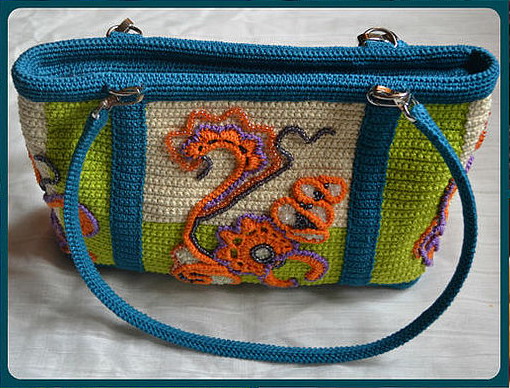
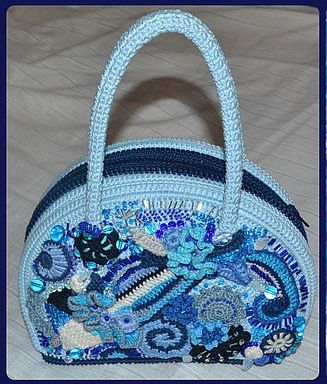
A few ideas for making knitted bags yourself:
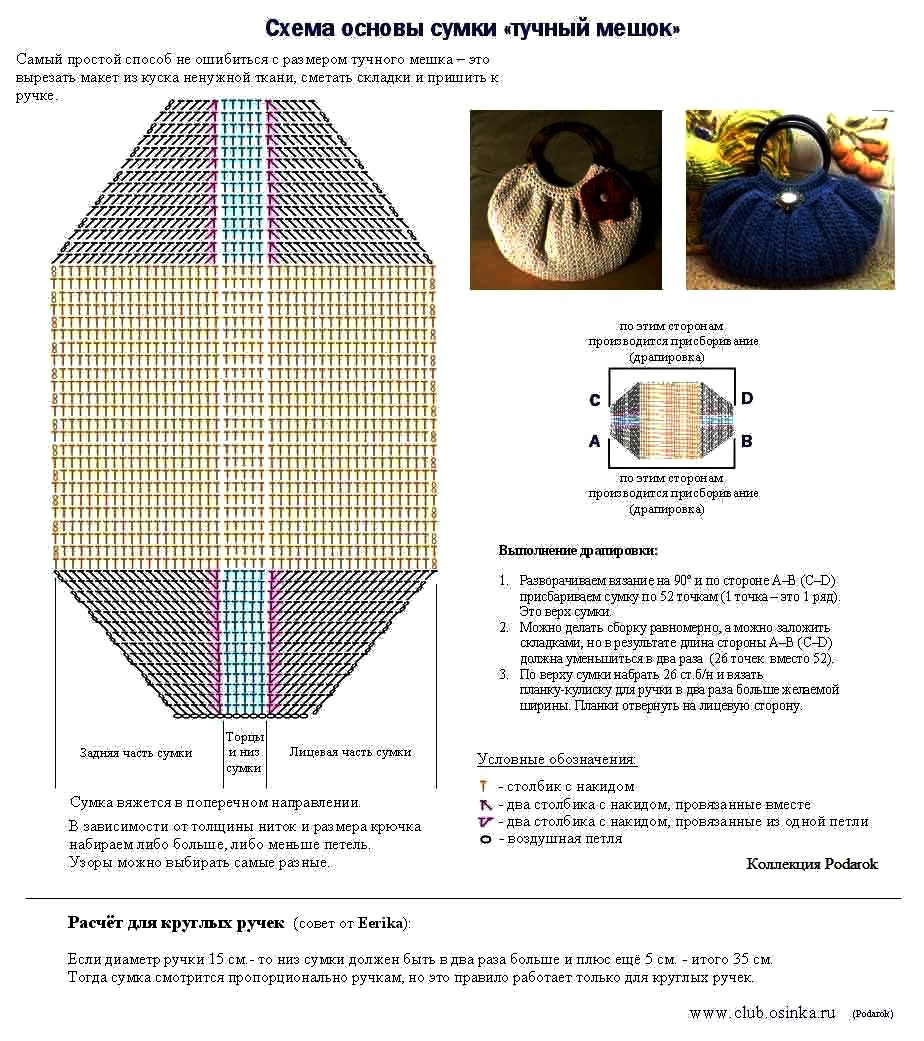
Bag "Fat Bag"
Crochet Basket Bag
Fashion crochet bag with leather decor

Knitted bag with needles with a braid pattern
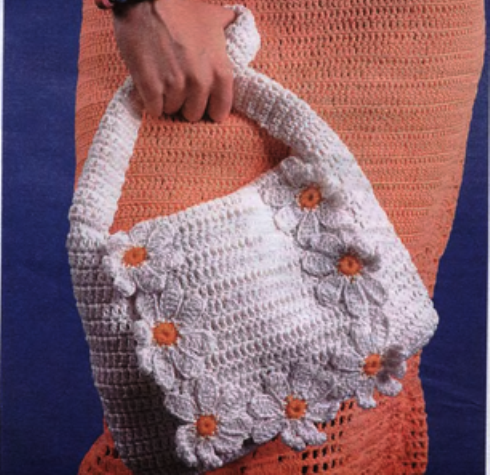
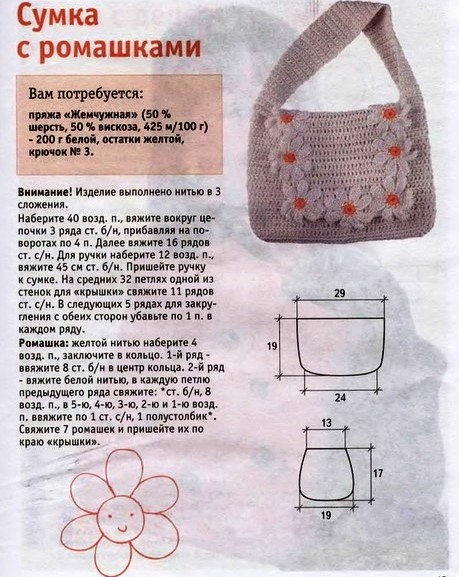
Crocheted bag decorated with flowers
As you can see, it’s very easy to tie a bag with your own hands. Inspiration and even loops!
Free subscription to the electronic magazine "DIY Accessories". The most fashionable ideas of the season in your inbox! To each subscriber - from our magazine!
The master class is taken from the Internet (at the bottom of the post link)
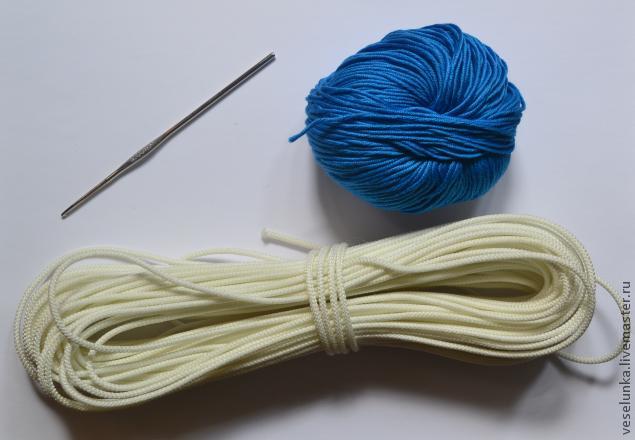
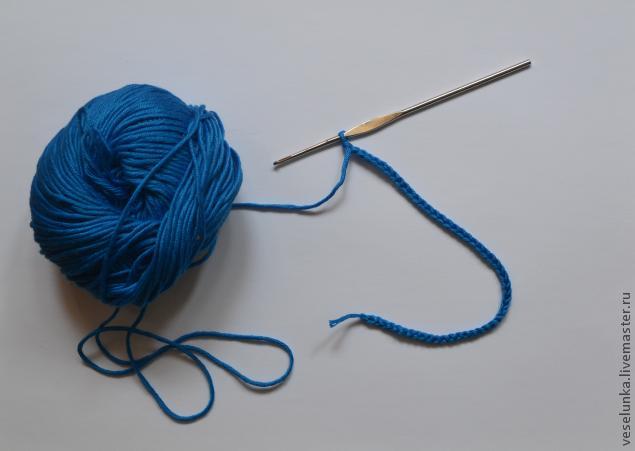
We need:
Yarn. It is possible one color, it is possible two, at will. I made 2 colors for clarity.
Hook.
Harness.
The number of loops dialed depends on the thickness of the harness. It’s easy to define: try on the chain from. n. around that same tourniquet
I scored 6 in. p. + 1 in. p. lifting, unfolded knitting, knitted 6 tbsp. non-cash Expand again, 1 in. item lift, 6 tbsp. non-cash
Some people prefer to make a patterned edge along the handle, rather than across, like me. But! In this case, the edges will be different and the bound tape will not be so elastic.
We continue to knit until we get the required length of the handle
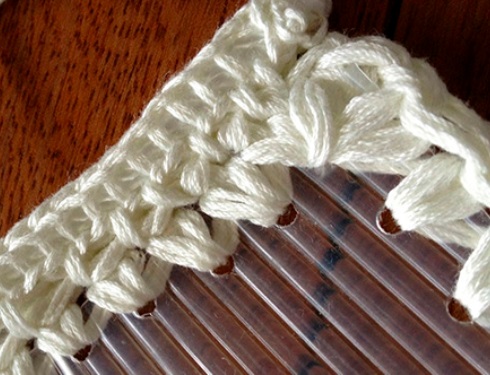
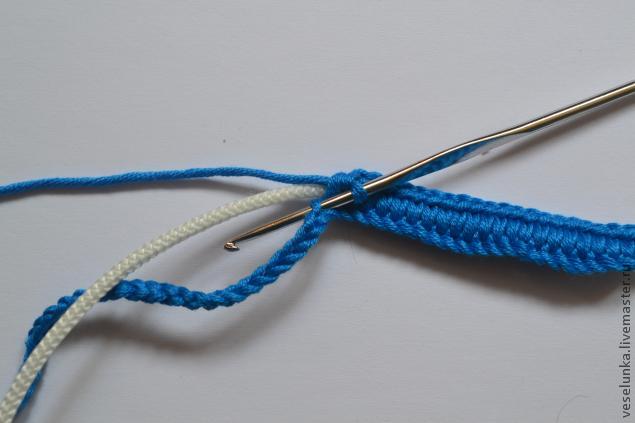
Now we begin to tie the edges with a crustacean step. The lower edges of the handles should be flat (we then sew them to the bag), and the handle itself should be round. We begin to knit with a crayfish step in the place where the edges will connect around the tourniquet: 
Having tied up the flat part of the handle, we attach a tourniquet and connect both edges. Now we knit with a crayfish step, catching both edges of the tape at once: 
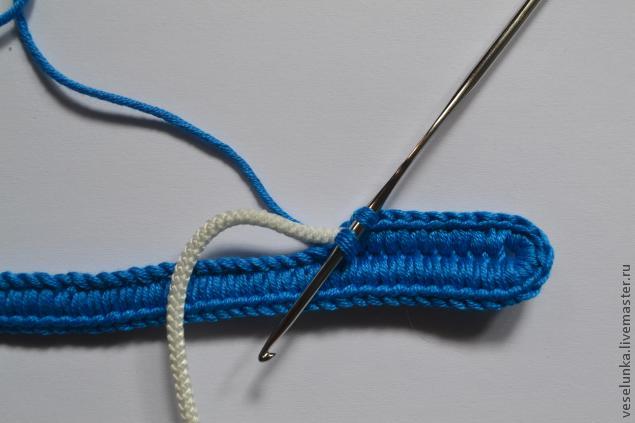
By the end of the tape, do not forget to make a flat end again. And we get such a pen: ![]()
Sew finished handles with flat ends to the bag. At the same time, at the junction of the edges of the tape, we pierce through the harness several times: then our handles will retain their shape and will be stronger
http://www.liveinternet.ru/users/4938422/post283729914/
http://veselunka.com/master-klassy/12-ruchki2
More posts on this topic
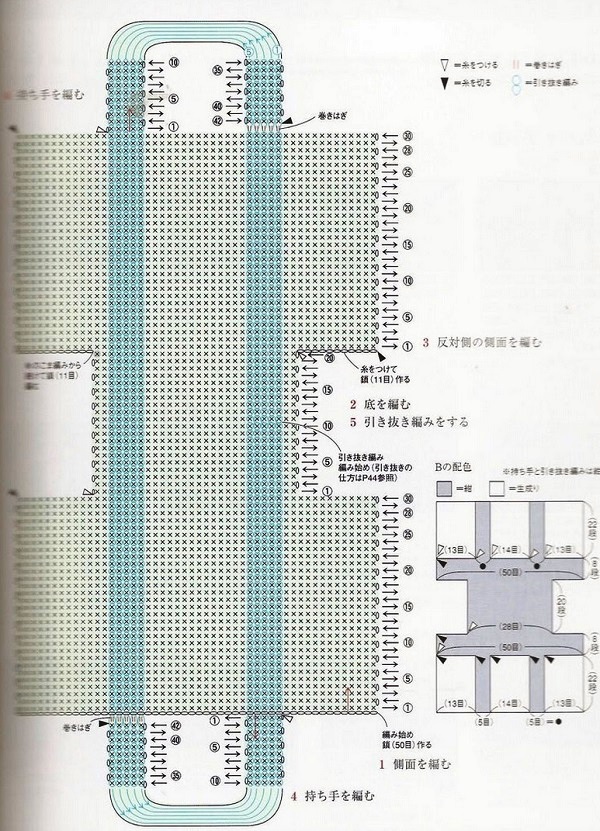
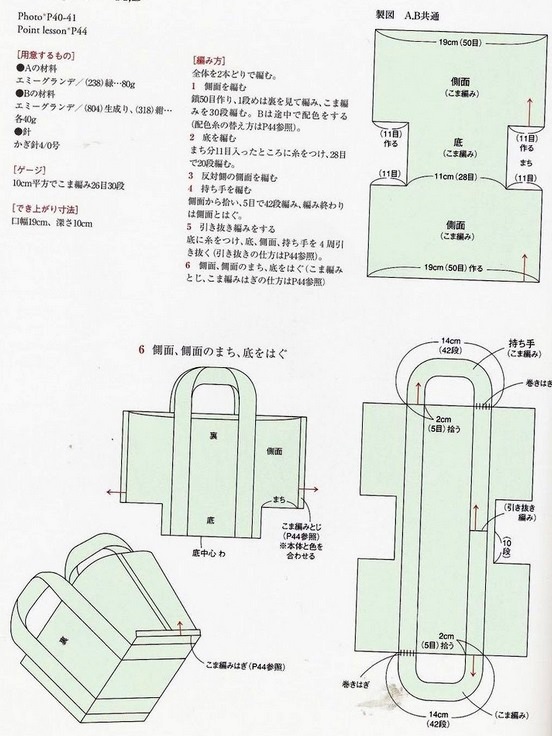
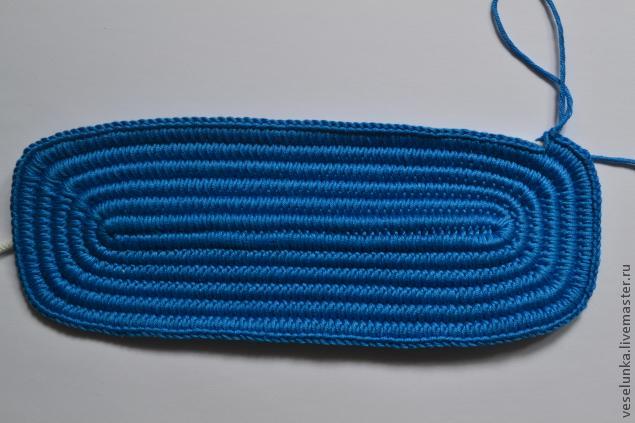
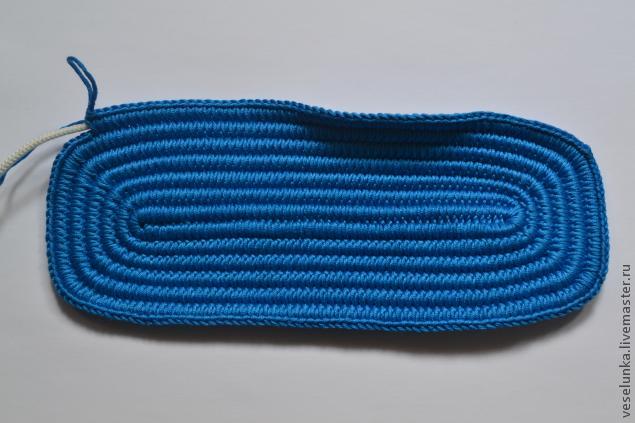
Knitted handbags_ How to tie the bottom and durable handlesLet's figure out how to tie a tight and comfortable bottom for the bag and analyze 2 ways to knit handles to it.
- First we knit BOTTOM handbags:
For this we need:
note to the fact that the harness must be tough! A dense bottom from a soft tourniquet will not work.
We start knitting:
- we knit chain of air loops. Chain of c. P. should be shorter than the planned length by the length of the width of the bag.
For example: we want to tie a bottom measuring 25x10 cm. So, the chain length: 25cm.-10cm. \u003d 15 cm.
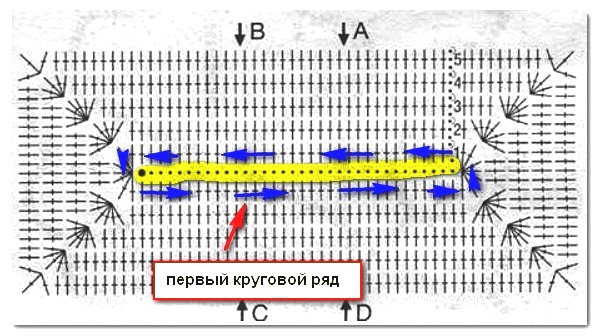
- Linking the chain take a tourniquet and start tying with crochets Around him:
1. put the hook in. n. before the tourniquet, we catch the yarn that passes behind the tourniquet,
2. pull the loop and knit two together.
We knit the columns close to each other if we want the tourniquet to completely hide, or rarely enough so that the tourniquet flashes through knitting. In this case, it is tightly connected.
- When reached the end of the chain, unfold and knit in the opposite direction.
- In the last loop of the chain we knit several SC, to round the bottom.
- Finishing the circle, we hide the tip of the harness in knittingtightening the loops tighter.
- The bottom can be connected either oval or rectangular - it depends on where to add the columns. In the photo - done rectangular bottom, added a few extra to the corner posts.
- If knit oval bottom then it is worth adding columns also in several places of the width of the bag.
- And one more last but very important detail! When we tie harness, he can lay down a little in waves.
- Therefore, finishing each row, we hold knitting on one side, on the other hand, you need to slightly pull the cord to align the pattern.
- Thus, we knit until we get the bottom of the right size, after which we cut the cord and continue to knit the bag itself with the desired pattern.
The bag can be knitted with any pattern selected at will -----
We turn to knitting pens.
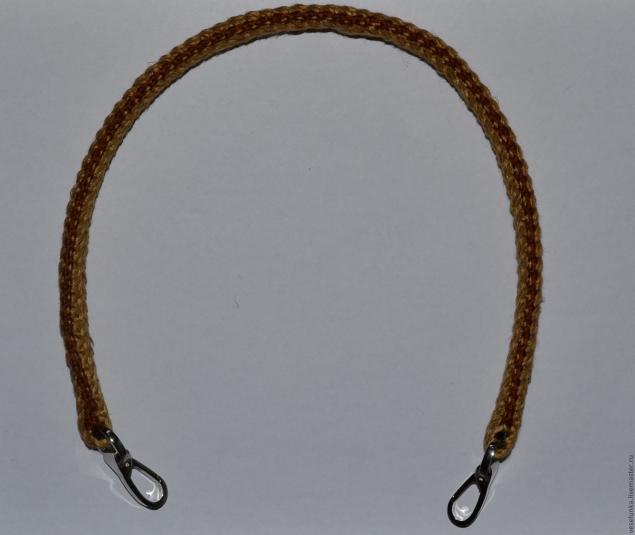
You will need:
- Linen yarn in two colors (optional).
- Regiline 0.4 cm wide.
- Carbines.
- Needle, thread.
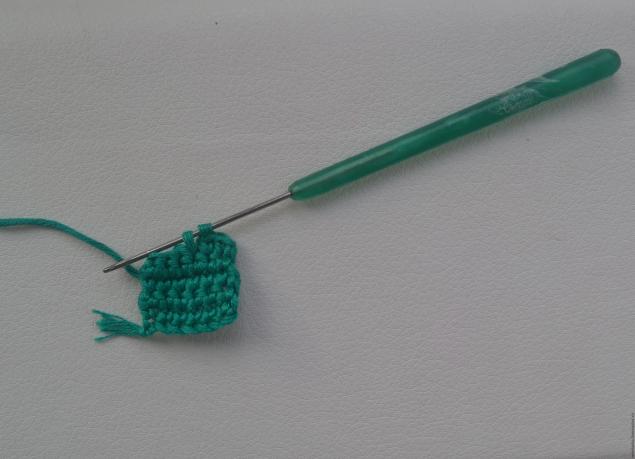
To begin with, we knit a lighter yarn just a cord - a little over a centimeter wide. Here is one:
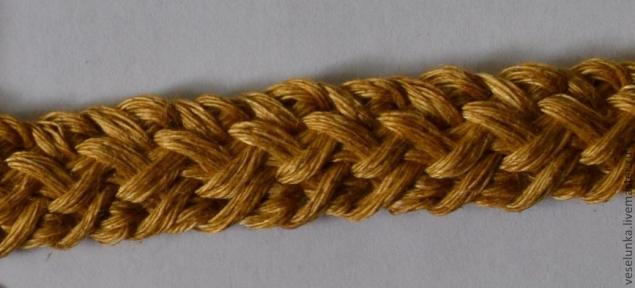
The cord can be knitted with any pattern that you like.
I’ll tell you step by step how to complete this example.
- We recruit 3 c. P.,
- in the second and third we dial 2 loops,
- knit crochet - all three loops together
- deploy (thread before work - it will be wrong side side) and we collect 2 loops,
- we knit three together and so on - in a circle.
Here is the process:
A thread BEHIND work. On the front side we stretch two loops.
And knit them together.
Turn over to the wrong side. Thread BEFORE work.
We collect one loop.

Pull the second loop. Pay attention to the crochet of the thread.
And also knit three loops together.
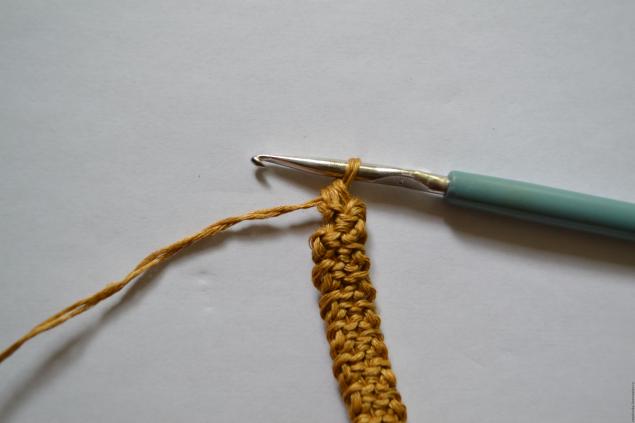
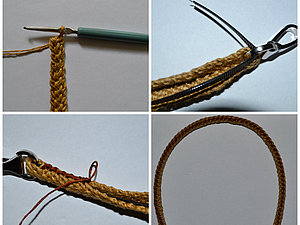
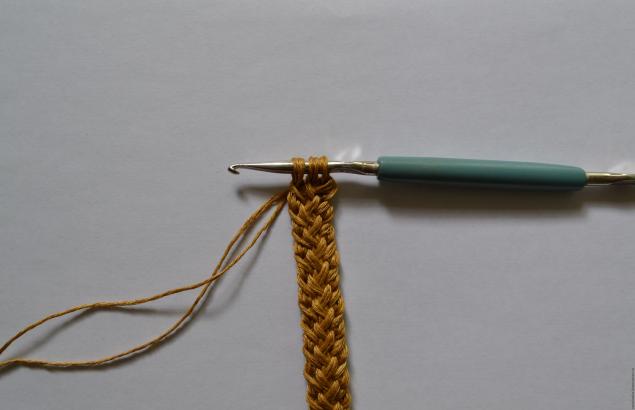
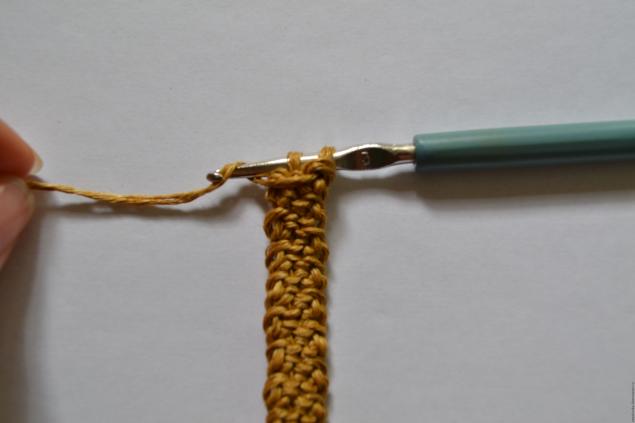
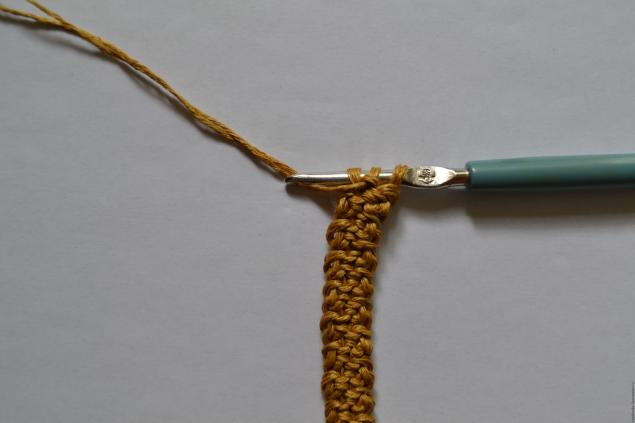
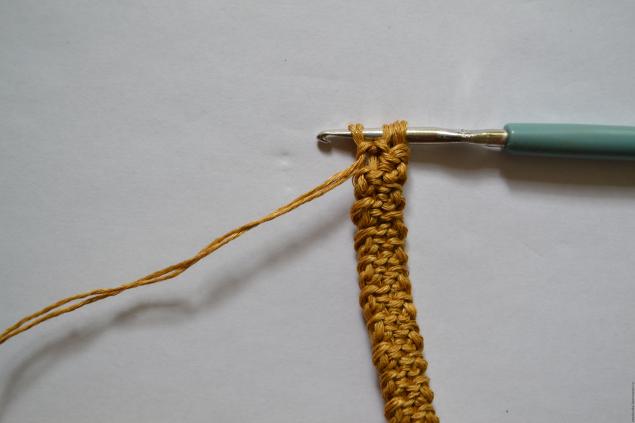
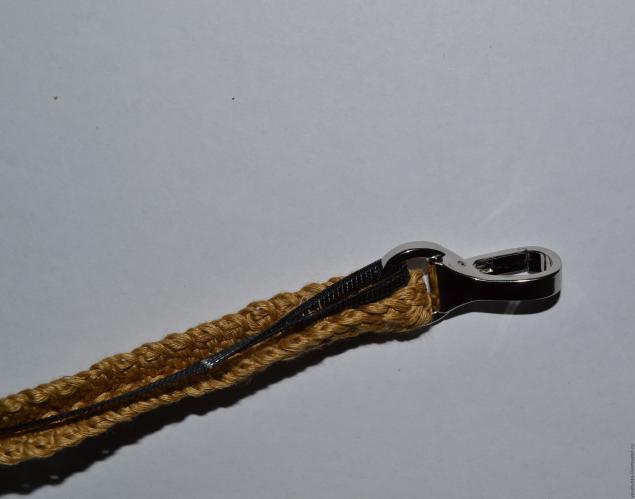
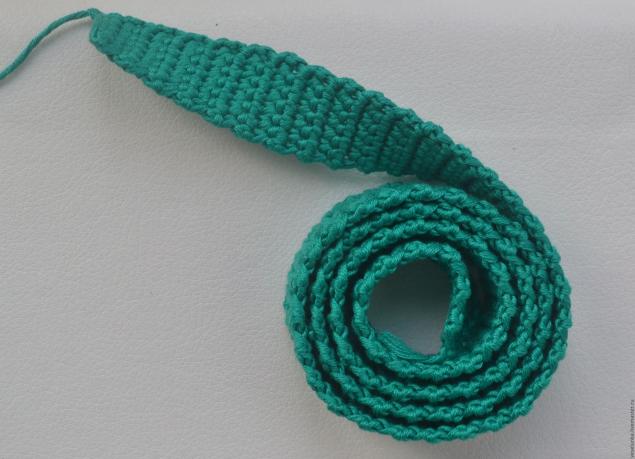
So we continue until we tie the cord of the desired length. Then we pass it through carbines and sew in the middle. We sew the lateral edge with a crustacean step with yarn of a different color:
![]()
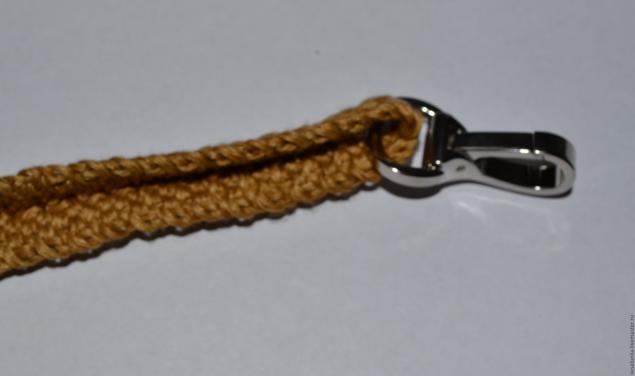
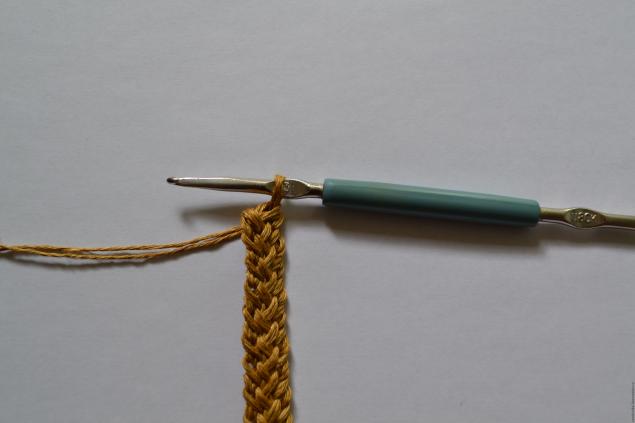
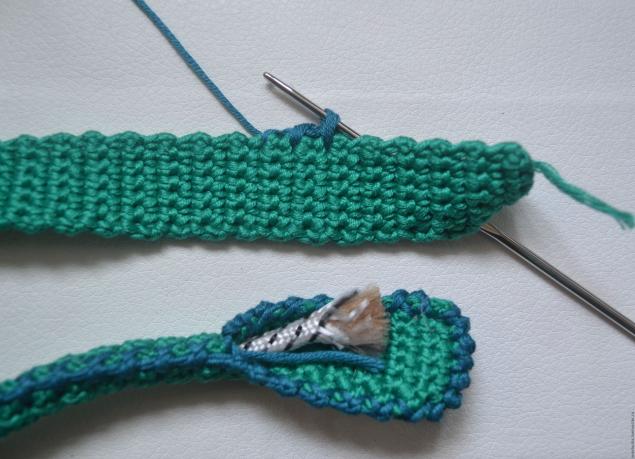
So, we bend the regilin around the carabiner, on the inside of the cord:
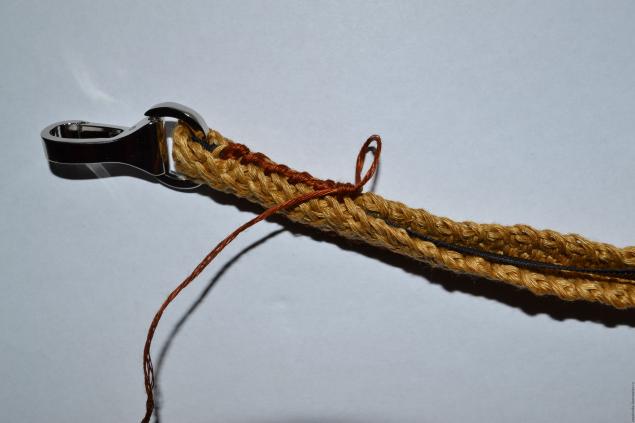
We sew regiline with a loop and put it inside:
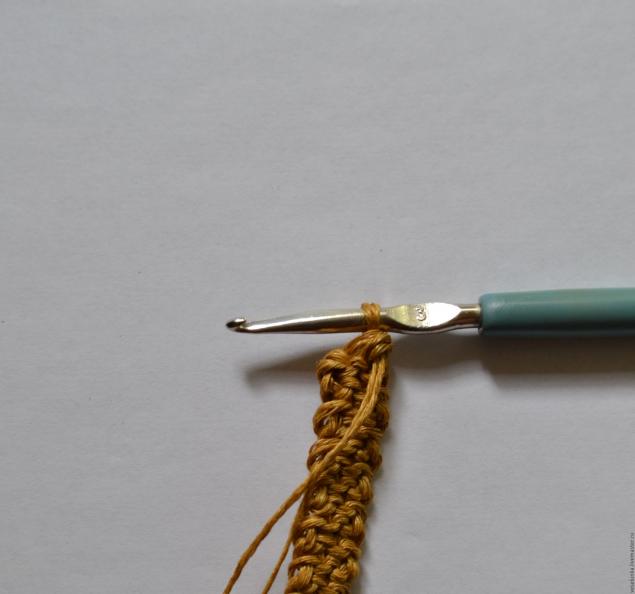
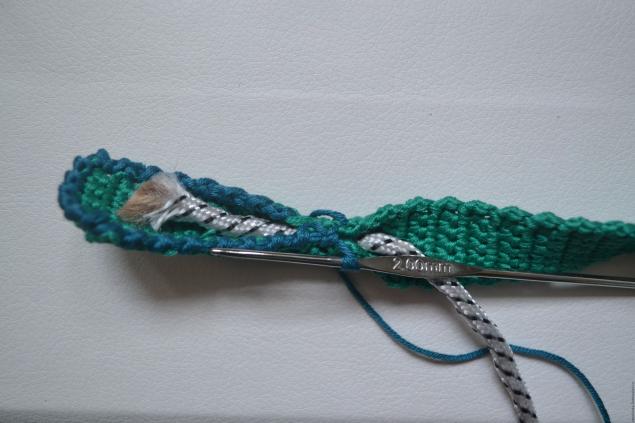
After this, we sew with a crustacean step and the second side edge:
After performing these simple manipulations, we get the real, neat, non-stretch handlesthat can only be attached to the finished bag.
- Second way
One more handle for a bag, they are simpler.
We need:
- Yarn. It is possible one color, it is possible two, at will. The photo is made in two colors for clarity.
- Hook.
- Harness.
The number of loops dialed depends on the thickness of the harness. It’s easy to define: try on the chain from. n. around that same tourniquet :). We analyze an example:
- We dial 6 in. p. + 1 in. n lift
- deploy knitting, knit 6 tbsp. non-cash
- Expand again, 1 in. item lift, 6 tbsp. non-cash
Some people prefer to make a patterned edge along the handle, rather than across, as here. But! In this case, the edges will be different and the bound tape will not be so elastic.
We continue to knit until we get the required length of the handle.
Now we begin to tie the edges with a crustacean step.
The lower edges of the handles should be flat (we then sew them to the bag), and the handle itself should be round. We begin to knit with a crayfish step in the place where the edges will connect around the tourniquet:
Having tied up the flat part of the handle, we attach a tourniquet and connect both edges. Now we knit with a crayfish step, catching both edges of the tape at once:
By the end of the tape, do not forget to make a flat end again. And we get such a pen:
Sew finished handles with flat ends to the bag. At the same time, at the junction of the edges of the tape, we pierce through the harness several times: then our handles will retain their shape and will be stronger.
A hook is a unique knitting tool with which you can create beautiful and durable harnesses, a technique for knitting a round twisted bundle - handles for a bag with your own hands - we will consider in the presented article.
Thickness knitted harness depends on the thickness of the threads used and the number of loops in the initial chain, the thicker the thread, the more loops you need to dial in the initial chain.
In order to make handles for a bag with your own hands, it is worth deciding on the material of the product itself. Handles should be in harmony with the bag itself, so as not to spoil the appearance of the accessory. This is a very important and crucial step in the entire process of creating handles for your bag. That is why we suggest that you take it very seriously.
Braided handles are made of fabric, leather or tow. The most common technique is braiding braids from three or six plaits. These handles go well with an ethnic-style bag.
An interesting and rather unusual option for the design of handles for a bag with your own hands is the use of chains of different diameters and thicknesses. Chains can be purchased at a specialty store or used from a personal wardrobe. To maintain contrast, you can insert a long ribbon inside the rings in the color of your handbag.
For a rag bag, an ideal option would be a pen from a similar look and color of fabric. For its strength, a rope or lining is placed inside. Such a product will perfectly withstand any load. This option of a bag and handles is very convenient to use in the summer.
Handles made of beads will also add originality and uniqueness to your handbag. Beads can be purchased at a specialized craft store or use old unnecessary accessories.
Ropes, cords, ribbons are also used by craftswomen as handles for bags. They can be a bright interesting shade with a unique design or have a plain and calm color.
Decide on the desired options for the bag and choose the most suitable handles for it. If you want to carry summer light bags, then you should opt for ribbon handles, ribbons or beads.
Crocheted crochet of threads: description and detailed photos of the knitting process
So, for knitting a test pattern you need to take not too thin, light yarn and a suitable knitting hook in diameter. Crochet a chain of five to ten stitches (depending on the thickness of the thread) and knit the first row with single crochet stitches. Turning the work over, consider the first row and mark the jumpers under the loops into which you need to enter the working hook when further knitting the pattern.
Then start making your knitting in a circular direction with the help of single crochet columns, introducing a hook from the outside of the loops for the jumper formed. Continue to knit your bag handle to the length of the cord you need.
Workshop on weaving cord handles
Prepare the following materials and tools for work:
- yarn of any color you need;
- magnetic cord;
- knitting hook;
- half rings for bag handles;
- threads for sewing.
First you need to crochet a chain of one hundred and eighty air loops using yarn. You can form a larger number of loops, depending on the desired length of the handles.
Then start tying a chain of loops in a circular direction. Use single crochet for this step. Tie your chain in the described way on all sides evenly and accurately. The width of your blank should be such that you can wrap a magnetic cord around it.

Now cut a piece of lace that is equal in length to your workpiece of thread. Next, form a chain of fifteen to twenty air loops and tie the structure in a circular direction. Make four of these original blanks for the pens of your bag.
Now assemble all the structural elements together. Sew the lace into a large stock. Make neat and strong stitches with thread. You can attach the rings to the ends of your pens. Done.
Thematic video for the article
Watch a few videos on creating handles for bags from different materials. The proposed material clearly demonstrated the entire process of forming an accessory with your own hands.
